Hatching
Hatching functions, typically used to identify sections, are used to fill a closed area. A simple hatch consists of lines at a specified angle and separation distance. You can also select a predefined hatch pattern and density, or create your own pattern. Hatch boundaries can be defined by selecting individual segments, by automatic boundary detection, or by automatic detection of 3D section boundaries exported to 2D. Hatch boundaries must be closed, and any entities that are partially inside the boundary are not used. Hatch boundaries may contain islands.
If hatches are created in 3D views exported from 3D space into 2D area (hatching of 3D sections), connections between hatches and corresponding 3D objects are established. After changing 3D geometry and returning back to 2D mode, hatches are automatically updated. See Automatic updates of dimensions, axes and hatches after changes in 3D
Solid Fill
To use a solid fill, choose the horizontal line pattern and define a hatch distance smaller than the thickness of printed lines.
Hatching 2D Objects
 | Hatch, Select Boundaries - HAT |
Boundaries of hatch area are selected by cursor. Optionally, you can use:
 | Detect individual area segments – select a segment and a direction the boundary segments will be detected at. Confirm each segment by mouse click. Detection is stopped after the boundary is completed or at the open end of a segment. |
 | Detect continuous area boundary – select a segment and a direction the boundary segments will be detected at. Complete boundary is detected, or detection is stopped at the open end of a segment. |
 | Temporary segment closing area – allows creating a line, lines, circle or arc temporarily. It may be used for closing an open area or creating islands around a text. |
 | Temporary object – this is similar as the previous option except the temporary object is not pre-selected. It can be used conveniently if you need to create an island around a text and the text partially crosses the existing area boundary. |
 | Temporary removes restraining object. |
 | Automatic 3D section detection – turns detection of section boundaries on/off. This option allows hatching of 3D sections conveniently. Selection of 3D section boundaries should be combined with other options, because section boundaries itself may be partially obscured or may contain cross-lines. The option is obsolete and kept as legacy option. Use rather the next possibility. |
 | Updatable 3D sections detection. Unlikely the previous option, this detects entire hatch boundary created by export of 3D section. Cross lines are automatically removed. |
 | Blocks automatic detection of selected line types. This option automatically excludes detection of axes or invisible lines drawn in non-continuous style, for instance. |
 | Hatch, Detect Boundaries Automatically - AHB |
Contrary to the previous command, this hatching method detects closed hatch boundaries automatically during cursor movement. Automatic detection can be turned on/off. All other options available are the same as for previous command.
Hatched area boundaries are mostly created by continuous lines. By default, other line styles are excluded from automatic boundaries detection. You can turn on detection of non-continuous lines, if you click a corresponding icon in selection tool-bar, among additional options.
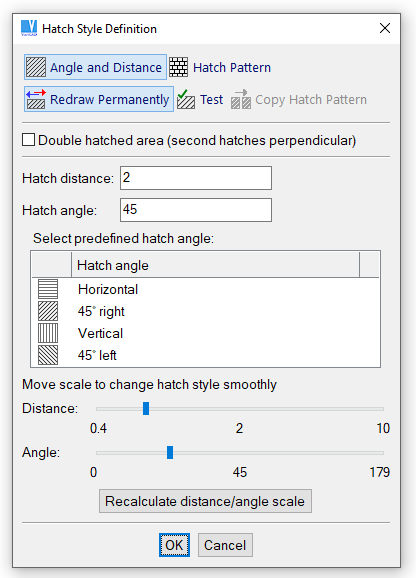
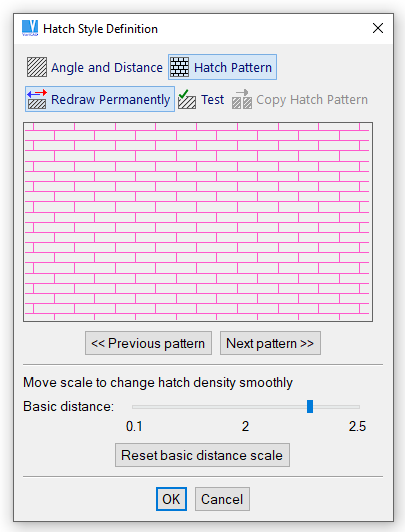
Selecting Hatch Style
You can choose between single hatching and a hatch pattern. If the single hatching is selected, an angle and a hatch distance are defined. In both cases, you can move the slider in hatch style window to change the hatch density continuously. Click button “Recalculate angle/distance scale” to change the hatch density slider margins.
Single hatch selection
Hatch patterns selection
Editing Hatches
 | Change Hatch Style - CHHP |
Changes style of existing hatches. Style definition is the same as for newly created hatches.
 | Change Hatch Area or Style - CHH |
This command changes style of existing hatches similarly as the previous command. Moreover, it redefines the hatch area boundary. Initial state of the new boundary is defined by the location where you clicked hatches to select them. Boundary can be added or deleted the same way as for newly defined hatches. Command can be conveniently used if the shape of the hatched area was modified.
Creating a Hatch Pattern
 | Create Pattern - CHP |
Create your own pattern or edit existing patterns. Each pattern is created as up to eight groups of lines. Each group is defined by an angle and a basic distance. You can define some lines in the group to be blanked. Each line can be assigned a line style, consisting of a number of line segments of specified length.