3D Assemblies
VariCAD enables you to define connections between part files, sub-assembly files and assembly files. Parts can be created and edited in their own files and then inserted into assemblies. If a part is edited, the change is transferred to all assemblies that contain the part. In addition, you can change a part within the assembly file and update the original part file, as well as other assemblies that contain the part. It is generally faster and more efficient to edit parts in their own files, since there is much less data in these files. But editing within the assembly can be handy if you need to edit only a small detail, especially a detail that affects other parts.
If a current file contains any parts inserted from other files, the file becomes an assembly file, and "Assembly" is displayed on the right side of the Status Bar. If the file contains a part used in an assembly, or an object identified as a part, "Part" appears on the Status Bar. If the current file is a sub-assembly, “Subassembly” is displayed. If the current file is assembly and contains also defined sub-assembly group, “Assembly+Sub.” is displayed.
Using links between parts and assemblies provides many advantages. However, you do not have to use links when working with multiple solids. Unlike other CAD systems, VariCAD provides freedom and flexibility when working with assemblies.
Assembly status is displayed in file-dialog and in recent files (history) panel, above the file preview image. This information is corresponding to highlighted item in list of files.
Creating Part Files, Assembly Files and Assembly Links
There are several ways to create assembly-part links:
- In the current file, select an object and use the Create Link from Part function. Define the filename for the part, and the object is saved to this file. The current file becomes the assembly file
- In the current file, select an object and use the Create Link to Assembly (Assemblies) function to "mark" the part to be used later in an assembly. Only one object in a file can be identified as a part.
- Make the current file as assembly by using File / Insert Objects from File and insert a file containing the defined part.
Saving and Loading the Assembly Files
While editing an assembly file, changes can be saved to part files as well as to the current assembly file. When opening an assembly file, the parts are loaded as they were last saved then the parts are updated from the part files. Therefore, if parts are changed after the assembly was saved, the changed parts will be used.
If part files cannot be located, a list of broken assembly links is displayed and you can use the following methods to resolve them:
- Leave the part as it was saved in assembly, and you can resolve links later. If you know the part file has not changed since the assembly was closed, this is the best option.
- Break the link permanently.
- Search for another file or directory. If there are parts in another directory, you can select one of them as a replacement. The new directory is identified, and you can change all links to use this path.
If you choose not to resolve any links, the parts will remain as they were saved last in the assembly.
Sub-assemblies
Instead of a single part inserted into assemblies, you can also define a group of solids as a sub-assembly. The sub-assembly objects are single separate objects in a sub-assembly file. When inserted into an assembly, they behave as one compact object.
The group of sub-assembly objects may contain also parts inserted from part files, or other sub-assemblies inserted from sub-assembly files. On the other side, in assembly file the sub-assembly may be also a member of sub-assembly group ready for insertion into higher level. This allows you to create a hierarchical structure of entire product.
The structure of assembly and sub-assemblies is displayed in BOM, see BOM Objects.
In many ways, sub-assemblies behave similarly as parts inserted into assemblies. But there are also significant differences:
- Unlike part inserted from a part-file, the sub-assemblies cannot be modified in assemblies. To modify a sub-assembly, right-click it and from menu, select “Open as part file”. Then perform changes at the separate sub-assembly file.
- Sub-assemblies are created from multiple objects. You can add objects into a sub-assembly group, delete objects from the group or change their mutual positions.
- When a part is inserted into assemblies, transformation uses the part’s insertion axes. However, a sub-assembly contains multiple objects. The insertion axes are defined separately for entire sub-assembly, in an extra step.
- A part may have defined its own attributes, like name, material etc. These attributes are defined for a single solid, both in part file and assembly file. Contrary to this, attributes of a sub-assembly in assembly file are data defined in the corresponding sub-assembly file as file attributes – see Assembly, Sub-assembly or Part Attributes, Fill Title Blocks.
Relative Paths in Assembly Links
By default, VariCAD uses absolute paths for all assembly to part or assembly to sub-assembly links. You can change the usage of absolute paths – in following command:
Complete System Settings - CFG |
- Changed paths are not solved – it means that only absolute paths are used. In case the part or sub-assembly is not found, you must solve the problem individually.
- Change of path is solved for the beginning of the path. This option can be used, if parts or sub-assemblies are stored at a server and if computers have differently mapped access to the server. For instance, the same path may begin with “J:\” at one computer, with “Z:\” at another computer and with “/mnt/” at third computer, using Linux.
- Complete changed path. This option is intended for situations when files are copied among different computers often, and different paths are used at each computer. In this case, parts or sub-assemblies must be saved in path under assembly or at the same level. If parts are used in multiple assemblies or sub-assemblies, they should be in one directory, “under” the path where assemblies are.
Paths are separated by “\” in Windows, and by “/” in UNIX. In assembly links used in VariCAD, separators are automatically handled according to current operating system. By other words – if assemblies and their parts are copied from Linux to Windows, path separators are changed automatically. If some computers in network use Windows and some use Linux, VariCAD assembly links are solved automatically, too.
Simultaneously Open Assembly and Part Files
Whenever you open and edit a part (detail) or sub-assembly, the file must be saved before you activate another file. Otherwise, any changes may be lost if you open simultaneously files linked within the current assembly structure.
Changed files can be saved automatically. By default, file save must be confirmed. If you do not wat to preserve changes, you have to close the file without save. Run command “CFG” to manage settings related to open assembly files.
Open Part File or Sub-assembly from Assembly - EDE |
Select a part or sub-assembly in assembly file, and its file is open.
More convenient method to open a part file or sub-assembly file is to right-click the solid and select “file open” from pop-up menu.
Definition of Assembly-Part links
Create Part, Save It into New Part File - DIA |
Defines a selected object as a part and exports it to its own file. The current file becomes the assembly, and the part-assembly link is established.
Define Part to be Inserted into Assembly - DEE |
Command defines the selected object as a part. The current document becomes a part file.
Change Definition of Part to be Inserted into Assembly - ROI |
If a file has a defined part, use this function to define a different part. Corresponding parts in all assemblies are changed according to this selection.
Definition of Sub-assembly - Part links
Create Sub-Assembly, Save It into New Sub-Assembly File -SBA |
Defines selected objects as a sub-assembly and exports them into their own file. The current file becomes an assembly, and the sub-assembly - assembly link is established.
Define or Change Sub-Assembly to be Inserted into Assembly - SBE |
Command defines the selected objects as a sub-assembly. The current document becomes a sub-assembly file.
Breaking Links between Part or Sub-assembly and Assembly
Break Link from Part or Sub-assembly - CSI |
In current assembly, breaks the assembly link for one group defined by the selected solid.
Break Definition of Part to be Inserted into Assembly - CDE |
In current part file, breaks the part definition. The file is no longer a part file.
Break Definition of Sub-Assembly to be Inserted into Assembly - CSB |
In current sub-assembly file, break the sub-assembly definition. The file is no longer a sub-assembly file.
Break All Links from Parts or Sub-assemblies - CAI |
Break all links in the current assembly. The current file loses its assembly status.
Editing Sub-assemblies or Parts in Assembly Environment
Parts or sub-assemblies can be edited separately in own files. However, you may often need to adjust shape of a part according to other parts in assembly, or rearrange locations of sub-assembly elements according to higher assembly. For these purposes, use editing in assembly environment.
When part or sub-assembly is edited, all assembly objects are copied into 3D space, where the part is edited. You may use the rest of assembly as tools for part modifying, you can measure values from them and you can modify them. Because these objects are mere copies, their changes are not transferred into actual assembly.
To distinguish copied parts from the edited part or sub-assembly solids, these parts are displayed in different pre-defined color.
Selecting Parts or Sub-assemblies for Editing
To select a part or sub-assembly for edit, right-click it and select editing in assembly environment from menu. This method selects only parts or sub-assemblies inserted into highest assembly level.
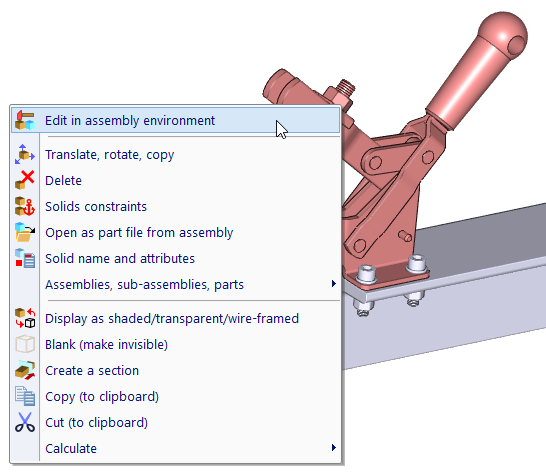
Pop-up displayed after clicking a sub-assembly or part
If you need to select objects from lower levels, press and hold Ctrl key and move cursor over parts in sub-assembly. Single parts from any level are detected. After right-click, a menu appears and you can select level the edited objects are from.
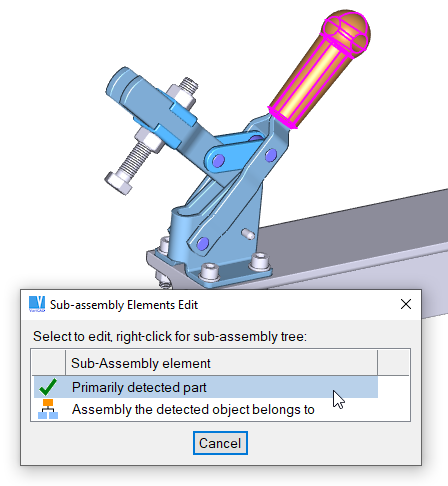
Selecting primarily detected single part
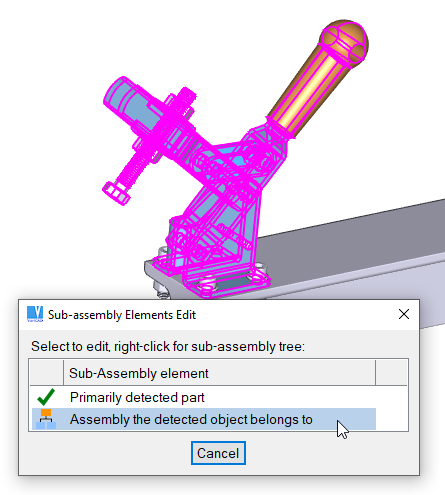
Selecting higher level, a sub-assembly the detected part belongs to.
Parts or sub-assemblies can be selected for editing in assembly environment, if you run assembly tree scheme. See Part Editing or Attributes Definition Mode. The object is selected from list.
Edit Part or Sub-Assembly in Assembly Environment - EDIA |
Calling this command is the last method of part selection. Edited object is selected by cursor.
Editing Parts or Sub-assemblies
While editing parts or sub-assemblies, a toolbar is displayed. Following options are available:
| Finish editing and return back to assembly. Edited object is saved and updated in assembly. |
| Return back to assembly. If objects were changed, all changes are discarded. |
| Change color of the rest of assembly objects. They can be displayed in predefined color or in their actual colors. We recommend to use display in predefined color. |
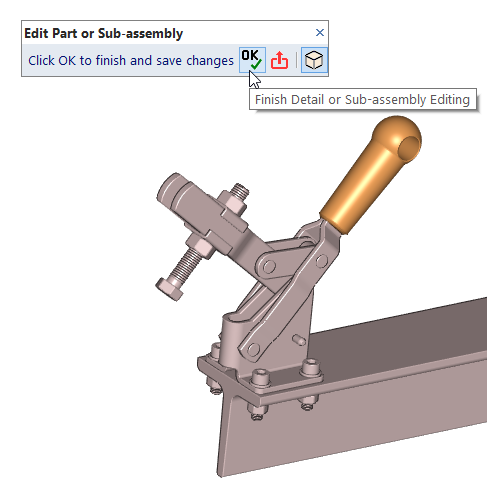
Editing part - the rest of assembly is displayed in distinctive color.
3D Assembly Tree Scheme
3D Assembly Tree Scheme Window
The assembly tree scheme allows you to select objects for standard commands, or to select single members from any level of assembly tree to change their names or attributes. Assembly tree window is open at a secondary monitor, if VariCAD runs at two monitor settings.
Assembly Tree Scheme - ASTR |
This command opens the assembly tree window. It can be called by right-click an empty area and then from pop-up, or you can click a corresponding icon in tool-bar.
Each solid in 3D space is displayed in assembly tree scheme. The scheme contains a list sorted by solids’ names and by assembly tree structures. If a solid has no name defined, a temporary name is assigned (like Part 1 – numbered part).
If you move cursor over lines in the scheme and a line is highlighted, corresponding solids in 3D are highlighted too.
First column contains the tree scheme. If you move cursor over the icons in this column, tool-tip containing corresponding file appears. Icons distinguish solid’s position within assembly tree:
| Icon | Type of object within assembly tree |
| Current assembly | |
| Plain part, no assembly links | |
| Supplementary object (paint, oil…) | |
| Sub-assembly | |
| Part imported from part-file | |
| Part, member of sub-assembly group | |
| Part, imported from part-file and member of sub-assembly group | |
| Sub-assembly, member of sub-assembly group |
The sub-assembly group is a group of objects defining the sub-assembly in the current file. This group is sub-assembly available for import into higher assemblies.
Second column contains file related information:
| Icon | Corresponding file or solid information |
| Corresponding file is open | |
| Corresponding file not found, cannot be open | |
| Solid is selected | |
| Attributes of solid at current level are changed | |
| Part or sub-assembly attributes are changed, will be saved |
These symbols may be combined together.
Third column contains names of solids. If cursor hovers above a solid name, tool-tip with all solid attributes appears.
The last column contains number of solids and also icons related to same names or identical groups:
| Icon | Name or solid group related information |
| Identical copies | |
| Multiple occurrence of the same name for plain copies | |
| Library parts | |
| Plain solid has the same name as adjacent inserted parts | |
| Plain solid has the same name as adjacent identical copy | |
| Identical copy has the same name as adjacent plain solid | |
| Identical copies, part or sub-assembly group |
If solids have the same name and if they are not part of an identical group, BOM may contain erroneous data. Solids are sorted and counted according to their names. If they are not in identical group, they may be changed individually. Consequently, parts with different shapes may occur under the same name.
You may create identical group from selected group of solids – see Add Solids to Identical Copies
Objects Select Mode
Objects select mode allows you to select objects for further edit commands, similarly as if you click objects in 3D space and after right-click, select a command from pop-up menu. You can select solids only at the highest assembly level for editing.
You may left-click multiple lines and finish selection by right-click, or you may right-click a single line for editing a single corresponding item.
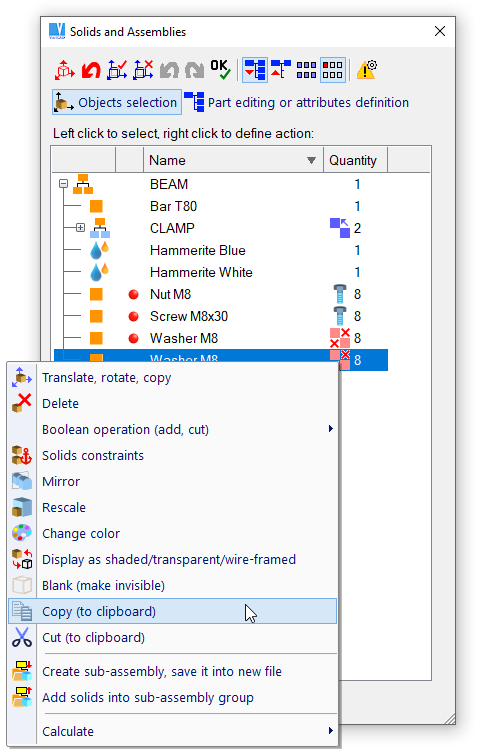
Assembly tree structure, objects select mode
Part Editing or Attributes Definition Mode
Left-click starts definition of name or attribute of selected object. Right-click opens a pop-up menu, see image below. In this example, next step would be editing of the corresponding part.
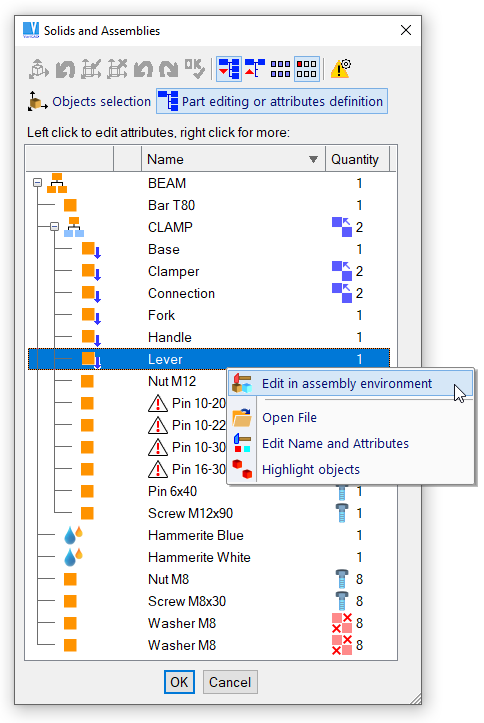
Assembly tree structure, part editing or attributes select mode.
Managing All Assembly Tree Files
Assembly Tree Files - OATR |
This command opens a window containing assembly structure of all files related to currently open files. You can open any sub-assembly or a part file if you click a corresponding line in the table. Mainly, the file structure listing contains dates of last changes of all related parts or sub-assemblies. The command is available from pull-down menu Window.
If you move cursor over icons in the scheme, a tool-tip with additional information appears.
While open an assembly or sub-assembly, files from lower levels are reloaded. If date of their change is older than date of change of the assembly, reloading may be optionally skipped.
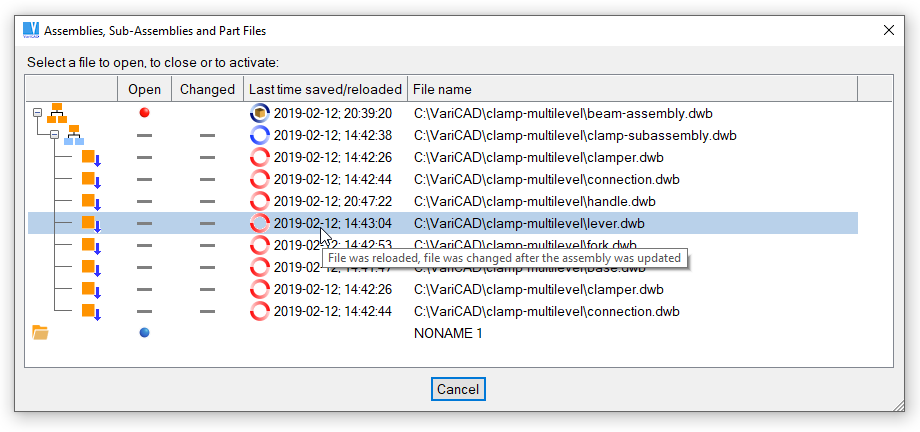
Assembly tree files